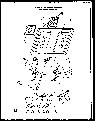
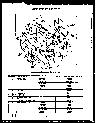
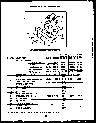
Parts Diagram for Amana RLD112 Range - Oven/Stove: Oven Door Assembly
See parts diagram(s) for Amana RLD112 Range - Oven/Stove. Use our parts diagrams to identify which parts need replacement and how to remove and replace parts.
View Popular
Lower oven components
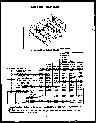
Cabinet assembly 36\" w/o griddle
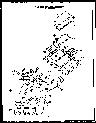
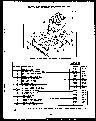
Top and Burner Assembly
Plain oven door
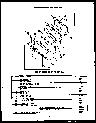
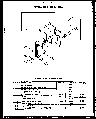
Upper Oven Door Assembly
Upper oven cabinet parts
Upper oven components
Cabinet assembly 20\"
Oven Door Assembly
Backguard Assembly
Upper oven control panel
Top and burner assembly 36\" models
Oven door - black glass
Lower oven door components
Lower broiler components
Black glass broiler door components
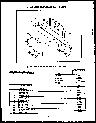
Parts for your
Amana RLD112 Range - Oven/Stove Oven Door Assembly
The Latch Spring is needed when repairing your appliance and is a genuine OEM (Original Equipment Manufacturer) part from .
Eventually parts can wear out on your appliance, when that happens trust Genuine Replacement Parts to have the replacement part you need to fix your appliance. We are one of the top online options for replacement parts and repair. If you have the model number or part number of your appliance that is different than what is being shown, please enter it at the top search bar for best results.
This requires part when fixing your appliance. Follow the instructions in the owner's manual to install the part.
The Head Latch is needed when repairing your appliance and is a genuine OEM (Original Equipment Manufacturer) part from .
Eventually parts can wear out on your appliance, when that happens trust Genuine Replacement Parts to have the replacement part you need to fix your appliance. We are one of the top online options for replacement parts and repair. If you have the model number or part number of your appliance that is different than what is being shown, please enter it at the top search bar for best results.
This requires part when fixing your appliance. Follow the instructions in the owner's manual to install the part.
Broiler Pan and Grid for Amana RLD112 Range - Oven/Stove. Genuine product manufactured by Amana. Includes the porcelain broiler pan and tray. Size: 1.5 x 12.75 x 16.75 in.
The Dacor Latch Spring is needed when repairing your Dacor appliance and is a genuine OEM (Original Equipment Manufacturer) part from Dacor.
Eventually parts can wear out on your Dacor appliance, when that happens trust Genuine Replacement Parts to have the Dacor replacement part you need to fix your appliance. We are one of the top online options for Dacor replacement parts and repair. If you have the model number or part number of your appliance that is different than what is being shown, please enter it at the top search bar for best results.
This Dacor requires part when fixing your appliance. Follow the instructions in the owner's manual to install the part.
The Dacor Head Latch is needed when repairing your Dacor appliance and is a genuine OEM (Original Equipment Manufacturer) part from Dacor.
Eventually parts can wear out on your Dacor appliance, when that happens trust Genuine Replacement Parts to have the Dacor replacement part you need to fix your appliance. We are one of the top online options for Dacor replacement parts and repair. If you have the model number or part number of your appliance that is different than what is being shown, please enter it at the top search bar for best results.
This Dacor requires part when fixing your appliance. Follow the instructions in the owner's manual to install the part.
The Dacor Button is needed when repairing your Dacor appliance and is a genuine OEM (Original Equipment Manufacturer) part from Dacor.
Eventually parts can wear out on your Dacor appliance, when that happens trust Genuine Replacement Parts to have the Dacor replacement part you need to fix your appliance. We are one of the top online options for Dacor replacement parts and repair. If you have the model number or part number of your appliance that is different than what is being shown, please enter it at the top search bar for best results.
This Dacor requires part when fixing your appliance. Follow the instructions in the owner's manual to install the part.