Speed Queen AWM372W2/PAWM372W2 Replacement Parts (OEM)
See parts diagram(s) for Speed Queen AWM372W2/PAWM372W2. Use our parts diagrams to identify which parts need replacement and how to remove and replace parts.
View Popular
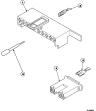
Graphic panel, control hood and controls
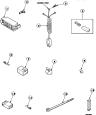
Graphic panel, control hood and controls 2
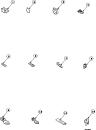
Graphic panel, control hood and controls 3
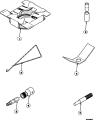
GRAPHIC PANEL, CONTROL HOOD AND CONTROLS 4
GRAPHIC PANEL, CONTROL HOOD AND CONTROLS 5
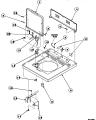
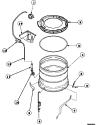
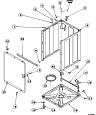
CABINET TOP, LOADING DOOR AND CONTROL REAR PANEL
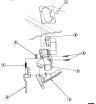
Out-of-balance switch
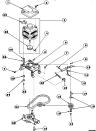
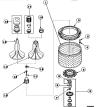
Motor, mounting bracket, belt, pump and idler assembly
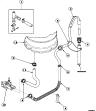
INLET HOSE, FILL HOSE, MIXING VALVE & MOUNTING BRACKET
Lid Hinge Bushing for Speed Queen AWM372W2/PAWM372W2 Washing Machine. Genuine Product, Whirlpool manufactured the original product for your Speed Queen AWM372W2/PAWM372W2.
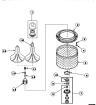
Agitator HookS for Speed Queen AWM372W2/PAWM372W2 Washing Machine. Genuine Product, Whirlpool manufactured the original product for your Speed Queen AWM372W2/PAWM372W2.
Water Inlet Valve for Speed Queen AWM372W2/PAWM372W2 Washing Machine. Genuine Product, Whirlpool manufactured the original product for your Speed Queen AWM372W2/PAWM372W2.
Hex Head Screw for Speed Queen AWM372W2/PAWM372W2 Washing Machine. Genuine Product, Whirlpool manufactured the original product for your Speed Queen AWM372W2/PAWM372W2.
The Alliance Laundry Systems Temperature Switch is needed when repairing your Alliance Laundry Systems appliance and is a genuine OEM (Original Equipment Manufacturer) part from Alliance Laundry Systems.
Eventually parts can wear out on your Alliance Laundry Systems appliance, when that happens trust Genuine Replacement Parts to have the Alliance Laundry Systems replacement part you need to fix your appliance. We are one of the top online options for Alliance Laundry Systems replacement parts and repair. If you have the model number or part number of your appliance that is different than what is being shown, please enter it at the top search bar for best results.
This Alliance Laundry Systems requires part when fixing your appliance. Follow the instructions in the owner's manual to install the part.


")
 TAP HXWAHD 8B18X38")
")
")
")
")