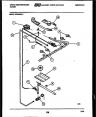
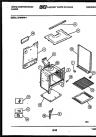
Parts Diagram for White Westinghouse GF320ND1 Range - Oven/Stove: 06-BURNER,MANIFOLDANDGASCONTROL
See parts diagram(s) for White Westinghouse GF320ND1 Range - Oven/Stove. Use our parts diagrams to identify which parts need replacement and how to remove and replace parts.
View Popular
02-BACKGUARD
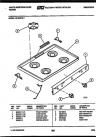
03-COOKTOPPARTS
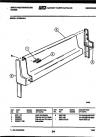
04-BROILERDRAWERPARTS
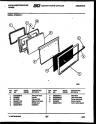
05-DOORPARTS
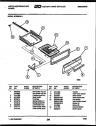
06-BURNER,MANIFOLDANDGASCONTROL
07-BODYPARTS
Parts for your
White Westinghouse GF320ND1 Range - Oven/Stove 06-BURNER,MANIFOLDANDGASCONTROL
Gas Burner (Rear) for White Westinghouse GF320ND1 Range - Oven/Stove. Genuine Product, Frigidaire manufactured the original product for your White Westinghouse GF320ND1.
Baking/Oven Rack for White Westinghouse GF320ND1 Range - Oven/Stove. Genuine Product, Frigidaire manufactured the original product for your White Westinghouse GF320ND1.
Oven Insulation Wrap for White Westinghouse GF320ND1 Range - Oven/Stove. Genuine Product, Frigidaire manufactured the original product for your White Westinghouse GF320ND1.
Oven Door Handle End Cap (Black) for White Westinghouse GF320ND1 Range - Oven/Stove. Genuine Product, Frigidaire manufactured the original product for your White Westinghouse GF320ND1.
Oven Door Hinge for White Westinghouse GF320ND1 Range - Oven/Stove. Genuine Product, Frigidaire manufactured the original product for your White Westinghouse GF320ND1.
The Frigidaire Rod is needed when repairing your Frigidaire appliance and is a genuine OEM (Original Equipment Manufacturer) part from Frigidaire.
Eventually parts can wear out on your Frigidaire appliance, when that happens trust Genuine Replacement Parts to have the Frigidaire replacement part you need to fix your appliance. We are one of the top online options for Frigidaire replacement parts and repair. If you have the model number or part number of your appliance that is different than what is being shown, please enter it at the top search bar for best results.
This Frigidaire requires part when fixing your appliance. Follow the instructions in the owner's manual to install the part.
The Frigidaire Door Seal is needed when repairing your Frigidaire appliance and is a genuine OEM (Original Equipment Manufacturer) part from Frigidaire.
Eventually parts can wear out on your Frigidaire appliance, when that happens trust Genuine Replacement Parts to have the Frigidaire replacement part you need to fix your appliance. We are one of the top online options for Frigidaire replacement parts and repair. If you have the model number or part number of your appliance that is different than what is being shown, please enter it at the top search bar for best results.
This Frigidaire requires part when fixing your appliance. Follow the instructions in the owner's manual to install the part.
The Frigidaire Leveling Screw is needed when repairing your Frigidaire appliance and is a genuine OEM (Original Equipment Manufacturer) part from Frigidaire.
Eventually parts can wear out on your Frigidaire appliance, when that happens trust Genuine Replacement Parts to have the Frigidaire replacement part you need to fix your appliance. We are one of the top online options for Frigidaire replacement parts and repair. If you have the model number or part number of your appliance that is different than what is being shown, please enter it at the top search bar for best results.
This Frigidaire requires part when fixing your appliance. Follow the instructions in the owner's manual to install the part.
The Frigidaire Clip is needed when repairing your Frigidaire appliance and is a genuine OEM (Original Equipment Manufacturer) part from Frigidaire.
Eventually parts can wear out on your Frigidaire appliance, when that happens trust Genuine Replacement Parts to have the Frigidaire replacement part you need to fix your appliance. We are one of the top online options for Frigidaire replacement parts and repair. If you have the model number or part number of your appliance that is different than what is being shown, please enter it at the top search bar for best results.
This Frigidaire requires part when fixing your appliance. Follow the instructions in the owner's manual to install the part.


")

 - Genuine OEM")


 - Genuine OEM")

 Left, Black")
 Black")
")
")
")
 - Genuine OEM")
")
")
")
")
")
")
")
")
")
")
")
")
")
")
")
")
")
 Top")
")
")
")
")
")
")
")
")

")
")
")
")
")
")
 Front")
")
")